Friday, May 29, 2020

The Binocular Blog - Afterthoughts & Accessories

This has probably been the longest blog series that I've completed and I acknowledge the role Corona has played it. While it has caused unbelievable numbers of human fatalities, it has also resurrected a comatose blog! I will be eternally grateful for that. I don't think I'll have the time for research and blogging like this, ever again, but I look forward to Corona saying farewell and life limping back to normal. I need more subjects for my blogs, so I have to start woodcrawling again soon, and not being totally obsessed with birds. 

It was actually a labour of love because I love all my binoculars, old and new. While researching, it gave me the opportunity to learn so much about binoculars. I hope you find it useful too. Internet is a vast storehouse of information and I've given a few links in the Introduction Post for this series (link here). You can refer the links I've provided for more information. When buying a binocular, ensure you compare brands and offers. Make an informed decision because it is an investment for a lifetime. 

There are a few things I couldn't slot in elsewhere so I will list them here. All binoculars come with some accessories in the box. Typically, they will provide a case, a neck strap, a cleaning cloth and the lens covers. There are other things you may consider adding as you go along. This is a partial list and in no way complete.
  1. Neoprene neck straps with padding. If you intend hanging the binocular around your neck, it will be more comfortable with a padded neck strap.
  2. Shoulder harness for heavier binoculars. If you are using a porro prism binocular or roof prism binoculars with 10x50 specifications or more, it is going to be heavy and will get very painful after a few hours around the neck. The harness will distribute the weight across your shoulders.
    Shoulder harness distributes weight on your shoulders
  3. Harness with chest case. Sometimes it is better to have chest harness with a storage case hanging on your chest. This is very useful if you are walking over rough terrain as the binocular will not hang loose and flop about. The storage case will also protect it from unexpected knocks.
    Shoulder harness with case
  4. Lens rain protection covers. All binoculars come with objective and eyepiece lens covers. It is a very frequently lost item if you are not careful. Many companies have tethered covers for objective lenses and eyelets on the eyepiece covers for threading onto your strap. If your binoculars don't have such ones, you can get after market ones.
  5. Tripod adapter and tripod. Heavier binoculars come with a tripod socket hidden on their hinges. If you have shaky hands, you can get an adapter to mount the binocular on a tripod, like a camera. If you are trying digi-binning a tripod mount is a must. As for the tripod, any tripod you use with photography gear will suit the purpose.

  6. Tripod adapter

    Tripod socket
     
    Universal mount

    For those who are impatient to go through the entire blog series, I'm giving below direct links to all the posts. You can go directly to the page you are interested in, though I suggest you go through each post as all of them contain some information that will be useful when you consider purchasing a binocular for your self.


    1.       Introduction
    5.       Part – 4: Eye Relief


The Binocular Blog - Part 10: Caring for your Bins

So, by now, you have decided to buy or have already bought a binocular. The binocular is not a toy. It is a sensitive optical instrument that will see many decades of flawless service if taken care of. I'm referring to the waterproof, dust proof and fog proof models and not the inexpensive ones. However, they also have to be cared for like any other gadget, to get the best out of them.

As I have mentioned in the earlier posts, binoculars are predominantly used outdoors. Therefore the risk of damage due to falls and knock are to be expected. Aside from that, depending on the weather conditions, it will be exposed to heat, dust and moisture. When your manufacturer says that the binoculars are waterproof, dust proof and fog proof, they mean that the internal surfaces are protected. Using the binoculars in the rain or dust can coat the outside surfaces dirt and grime. Not only that, if you make a habit of throwing the binoculars into your backpack or bag along with your water bottle, sandwich and bananas; rest assured it will reduce the life of your precious binocular.

1. STORAGE

When you store your binoculars make sure it is inside its own case. Don't just throw it in your bag with everything else to save the trouble of carrying an extra case. Binocular cases are designed specifically for carrying them in and all manufactures usually supply one or more cases, depending on the brand. 

Compact binoculars come with small pouches that can be looped on your belt. They will just about fit the binocular and nothing more. The neck strap of the binocular doubles as the strap for the pouch.

As the binoculars get bigger, the pouches get bigger and more sophisticated. My Zeiss Terra ED 8x42 came with two cases. One soft case with its own neck strap and a semi-hard case that could be looped on my belt.


Zeiss softcase
Zeiss semi-hard case

Zeiss semi-hard case with belt loops

The Vortex Viper HD 12x50 came with their Glasspak binocular harness but I found it a little tight for my binoculars. Perhaps they were designed for a 8x42 or 10x42, maybe even a 10x50, but I found putting it in and taking out the 12x50 a little annoyingly tight. Moreover, the mesh pockets are also a little tight and being made of mesh will not prevent stuff stored in it from getting dusty or wet. Not only that, since I also carry photography and bird sound recording gear, another thing on my chest is an interference. If you are only carrying a binocular this is perfectly fine. 

Vortex Glasspak binocular harness
Vortex Glasspak in position

Personally, I prefer a bag that I can clip around my waist as it stays out of the way of my photography and audio recording equipment.  So I got one from AliExpress which has five other zippered pouches beside the main compartment. It is useful for storing identity documents, driving license, Swiss army knife, purse, cell phone, GPS and any small stuff you fancy
Rests comfortably on your side.

Beside the extra storage, it takes the weight off my neck and shoulders when I carry the 12x50 into the field.


Lots of storage spaces

Main compartment has a purse-string closure, water resistant inner cover


While storing anywhere, either in your backpack or even in the binocular cover, ensure that your objective lens and ocular lens covers are in place. If it is off season and you don't intend to use the binoculars for a while, perhaps due to wet weather, it will be a good idea to place it in a zip-lock pouch with silica gel and then store in its case. If your hobby includes photography and you possess a dry-cabinet (de-humidifier) keep a small corner for your binocular!


2. CLEANING

Don't clean your binoculars too frequently. It is not usually required if you store it well even while in the field. When you are out hiking keep your objective and ocular lens cover on. Take it off only when you are  using it. That way you minimize the chance for dust and water to fall on your binoculars. Despite your care, sometimes you will have dust and moisture on your lenses and it will leave smudges. 

The immediate temptation, if you see a dirty binocular is to take out a tissue or any available material and wipe it clean. DON'T DO THAT. Dust is essentially microscopic sand particles. If you try to wipe it off, the particles may scratch the coating on the objective and ocular lens, eventually the scratches will result in a cloudy image.

The first step is to get the dust off. Use a blower brushes like the ones used to clean photography equipment. Try to dislodge the dust from the body and then the lenses by gently blowing air  while holding the binocular with the lens being cleaned facing down. Repeat for both objective and ocular lenses. 


Closed blower brush

Brush cover retracted

Blower nozzle under the brush end
You may have to dislodge larger particles with the brush on the blower or with a lens cleaning pen.  The lens pens usually have a brush on one end and a flat cleaning surface with a non-liquid compound on the other end. Both of these can easily be carried with you in your bag or pocket for use in the field.


Lens pen with brush exposed (top) and the dry tip (below)

Sometimes, stubborn dirt may require a little washing under a tap, assuming that the binocular is waterproof but let the flow be gentle. This might be required if you use the binoculars on the beach or sea. If you wash it in water, resist the urge to wipe the excess water dry. The cloth might cause scratches on the coatings. Wait for it to dry out naturally first. If there are smudges, it might require a wipe. 

Any smudges and more resistant dirt will need to be gently wiped out. To wipe the lenses, avoid using facial tissue, toilet tissue, ordinary towels, the edge of your T-shirt or saree or any handy material you find. Paper will most certainly leave scratches on the coating. You have to use a lint free cloth or micro fiber cloth for this purpose. Most binocular manufactures provide one inside your box. Keep that box along with your binocular in separate plastic cover so that it doesn't get dirty or dusty. A gentle circular wiping motion from the center to the edges with a dry micro-fiber cloth will usually do the trick but if it still refuses to go then you will need to use some cleaning liquids. You can also get lens cleaning kits that includes all or most of the items mentioned above.

Zeiss wet lens wipes and micro fiber cloth

Zeiss lens cleaning kit

There are lens cleaning solutions (with isopropyl alcohol) that are specifically made for camera and binocular lenses with coatings.  Don't use any glass or household cleaning liquid as they will most certainly damage the coatings permanently. Don't spray on the lens directly, instead spray a little solution (should be barely wet) onto one corner of the cloth and wipe in a circular motion. Once the smudge is gone, wipe again with the dry part of the cloth. 

Finally, don't wipe your binocular lenses very frequently. A slight layer of dust can be easily blown off. Wiping the lenses every time you use them will increase the risk of scratching them. Wipe only when significant dirt or smudges are there. Otherwise, store them carefully to prevent dust and dirt from accumulating. 

3. PROTECTION

  1. While walking with a binocular, don't hold it by the neck strap and let it swing. It can hit something or the strap might snap and you can damage the binocular with a heavy knock or fall. Keep it hung around your neck or with a shoulder harness. 
  2. If you have to move rapidly or through heavy undergrowth, either keep it zipped up inside the jacket or keep it inside the case. That will protect it from swinging wildly or falling. 
  3. When traveling keep it inside its case with the lens covers on. Falling from a speeding vehicle can damage the binocular, including throwing its glassware out of alignment. It may then have to be sent back to the factory for repairs.
  4. Don't keep it close to sources of high heat. It could melt the rubber or plastic armour on the body and also damage lens coatings and O-ring seals. 
  5. In heavy rain keep it inside its waterproof case with the objective and ocular protection covers fitted snugly. If the case is not waterproof a zip-lock pouch over the binocular or the case itself will prevent it from getting unnecessarily wet.
  6. When keeping in its case keep the eye cups down (retracted) otherwise a fall can twist it out of shape. In Porro prism binoculars, since the length increases when the eye cups are focus ring is turned, always close it to infinity focus position (down), otherwise it may not fit in the case properly.
For those who are impatient to go through the entire blog series, I'm giving below direct links to all the posts. You can go directly to the page you are interested in, though I suggest you go through each post as all of them contain some information that will be useful when you consider purchasing a binocular for your self.

1.       Introduction
2.       Part – 1: Anatomy of a Binocular
3.       Part – 2: Purpose and Portability
4.       Part – 3: Magnification, Objective diameter & FOV
5.       Part – 4: Eye Relief
6.       Part – 5: Exit pupil & Interpupillary distance
7.       Part – 6: Image brightness
8.       Part – 7: Focusing fundamentals
9.       Part – 8: Weather sealing
10.   Part – 9: Purchase decision
11.   Part – 10: Care & Storage
12.  Afterthoughts and accessories

Wednesday, May 27, 2020

The Binocular Blog - Part 9: Money on the Table

Now that you have acquired a fairly reasonable knowledge about binoculars, it is time to put it to good use before putting your money on the table. I'm not going to suggest any particular brand or model as that is decision you have to take. I will only take you through the process of decision making which will be different for everyone. 

What you will buy will depend on the purpose, your budget, availability of a particular brand or model, features on the binocular and most importantly serviceability and warranty. The last is often not considered but I know how difficult it is to a get a certain brand repaired in India. 

1. Purpose

Decide what you want it for. If you are buying one for casual use you needn't go for a high end, high magnification instrument. For an occasional user a compact or midsize will do. Some thing like a 10x25 or 8x32 , which will be quite handy. I keep a Bushnell H2O 10x25 in my car.
Easy to carry and lightweight for one-hand use.
It is small enough to handle with one hand and unobtrusive. It can be whipped out in a hurry and comfortable to hang around the neck even when driving. The whole thing fits into the palm of your hand and becomes pocket-ably smaller on folding up!
Unfolded compact (left) & folded completely (right)
Compacts may also be useful to throw in the bag for a long day of hiking, where larger binoculars may be extra weight and quite literally gives you a pain in the neck.

If you are a person who is interested in birds or wildlife you will need one with at least 8x or 10x magnification. Considering that both birds and wildlife are active in the early morning or evening the light will be low so you have to combine that magnification with a larger objective lens like a 42mm or 50mm (8x42, 10x42 or 10x50). Just keep in mind that as the numbers increase the size and weight of the binoculars will also increase. 
Size increases as magnification and objective size goes up.
Porro prism binoculars are also generally more bulkier, heavier and brighter but their weather sealing might not be comparable to roof prism binoculars.
Just to give you an idea how bulky a Porro prism binocular (Zenith on the left) can be.
The size and weight have to be given due consideration if you plan to spend hours or all day outdoor. 

2.  Your Budget

You can get extremely inexpensive binoculars that are mass produced and claim to be 'water resistant' and 'weather proof'. As I mentioned in the previous post, unless they are 'waterproof' these cheap binoculars may not last a season. The materials used will be plastic and the lenses maybe of substandard quality. I will give here the history of my experience in binocular purchase, just so that you can get an idea how 'upgrades' happen.

The Zenith 7x50 is bulky and heavy

The Olympus DPSI 8x40 was the first binocular I 'purchased', since the Zenith was bequeathed to me! It cost me around Rs.3500 back then and now is available from different sellers from Rs.4500 to Rs.5250 (around $65-70 US). At that time, I wasn't aware of the importance of the quality of the lenses and prisms or weather sealing. Essentially, I was a novice! That binocular might have lasted me two seasons before it became unusable. Since I had the Zenith 7x50, which despite its age was still giving excellent service, I decided to go for a compact binocular with a higher magnification, so I ended up buying the Bushnell 10x25 H2O at Rs.5100 or so in 2015. It is still available with some sellers with prices varying from Rs.6000 to Rs.11,000 (around $80-150 US)! 
Bushnell 10x25 compact

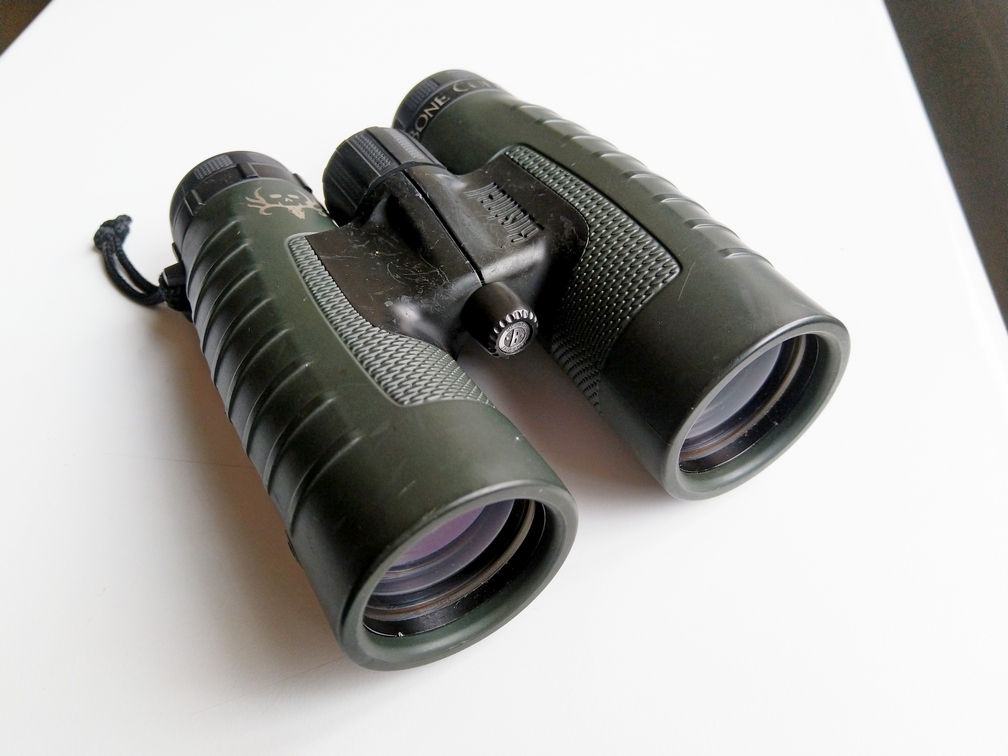
As the Zenith was getting to be a pain in the neck literally, because of its weight, and the compact Bushnell was proving inadequate in dim light, I decided I needed an upgrade (in 2016). I first fixed my budget around double of the compact and after a bit of a more detailed research, I settled for the Bushnell Trophy XLT 10x42. I had to pay a little more than I planned. It set me back by a little under Rs.14,000 but I had a medium budget, waterproof, fog proof and brighter binocular that seemed perfect for my use. After a couple of years of use, something happened to the diopter ring. The right eye wouldn't focus, probably after a fall or severe bump. 
Bushnell Trophy XLT 10x42
 That was the time I was again thinking of an upgrade and this time I thought a little 'bigger'. Three big names in binoculars are Zeiss, Swarovski and Leica. I would have had to up my budget but, I was about to invest in a binocular to last me a decade. Since, I already had a 10x42, albeit, only effective as a monocular telescope, I decided it would be an 8x42. The Zeiss Terra ED 8x42 seemed perfect for birding and walking around. Two features that swung the decision were the short focus (needs only less than one rotation of the knob to go from close focus to infinity) and its incredibly close focus distance of around 5 feet! Of course, being a Zeiss it was expected to leave a big hole in my pocket, even though it was technically a 'baby' Zeiss, and made in China. The sticker price was around Rs.34,000 but I got a deal of  30% discount through a good friend. The current price is still about the same, around Rs.37,000 (around $495 US). 
Zeiss Terra ED 8x42
Design by Zeiss!
Made in China hidden in the hinge!

Then, sometime in late 2018 I decided that I needed a little more reach than a 8x could provide. This was partly due to the fact that the 8x42 seemed a tad inadequate when trying to identify warblers in the canopy and ducks across the reservoir. I had by then progressed from novice stage to the advanced amateur level and my research threw up a name I hadn't considered before, Vortex. They  seemed to have review ratings right up there with the Zeiss', Swarovskis and Leicas, and so it wasn't very difficult to decide on the Vortex Viper HD 12x50. Both magnification and objective size had been taken up a notch and I had a binocular that could cover the defect in my range. It made a big hole in my pocket ($480 US, about Rs32,000 then) despite having got it from United States. It is now being sold at $740 US, which at today's rates is around Rs.55,000, but in India we'll have to shell out close to Rs.70,000!

Vortex Viper HD 12x50
 I have now reached a stage where I have to reach for the stars! The next binocular on my wish list is either a 10x42 Vortex Razor UHD ($2150) or the Zeiss Victory SF( $2750). What you will note is that we are never satisfied with what we already have so we keep adding to our collection, and each one is allegedly better than the previous one. I'm sure my Zeiss Terra ED or the Vortex Viper HD will easily see a decade of service but the temptation is too great!

I will leave below a list of some binoculars from reputed companies, randomly selected, just to give you an idea of the wide range of prices across the models. There are many brands not included in this list. These are brands which I have personally used or are being used by friends, and some premium ones which are just for drooling over!


Manufacturer & Model
Specification
Weight
Cost
1
Bushnell H2O Compact
10x25
300 grams
$50
2
Nikon Trialblazer ATB
10x25
300 grams
$75
3
Zeiss Terra ED Compact
10x25
300 grams
$380
4
Swarovski CL Pocket
10x25
360 grams
$880
5
Olympus Pro
8x42
670 grams
$470
6
Nikon Monarch 5
8x42
600 grams
$280
7
Zeiss Terra ED
8x42
750 grams
$450
8
Leica Trinovid HD
8x42
750 grams
$950
9
Vortex Razor UHD
8x42
913 grams
$1500
10
Bushnell Legend
10x42
666 grams
$170
11
Olympus Pro
10x42
665 grams
$520
12
Nikon Monarch 5
10x42
601 grams
$296
13
Zeiss Terra ED
10x42
725 grams
$449
14
Vortex Razor HD
10x42
700 grams
$1000
15
Swarowski SLC
10x42
795 grams
$1600
16
Nikon Prostaff 5
12x50
791 grams
$220
17
Vortex Viper HD
12x50
840 grams
$740
18
Zeiss Victory SF *
8x42
780 grams
$2700
19
Leica Noctvid*
10x42
860 grams
$2850
20
Swarowski EL50*
12x50
992 grams
$2870


3. Brand & Service

Brands matter. Period. If you buy one that looks good on paper without background research you are in for some regret. Brands like Olympus, Nikon and Canon are familiar as photography equipment manufactures so they have a strong service network and long presence in the market. As an ophthalmologist, Zeiss is a familiar name to me since they manufacture ophthalmic equipment. So, before jumping to a decision, visit the website of the company and look up the options, the reviews of their products, their dealer and service network. I went for the Vortex because of their unconditional lifetime warranty, as I can send it back to the US if required through friends or relatives.
Vortex VIP Warranty
All binoculars come with warranty limited to a few years or lifetime. They all have some conditions so read the small print. However, it is unlikely that you will need to use the warranty if you use your instrument carefully. Most modern binoculars can take rough treatment but a heavy knock or fall can cause breakage or misalignment of lenses or prisms. If that happens, you need a reliable service backup. Before you buy, enquire about the service also. 

There is no 'right binocular' for everyone. The is one for everyone's needs and since only you know what you need, weigh the options carefully. Before you put your money on the table, do some research about the company, the features, the weather sealing and warranty. Remember, the expensive ones are automatically better as there is a lot of effort put in their manufacturing. They are designed to last a few decades, like my Zenith, unless you manage to damage it so badly! That doesn't mean you go for a Zeiss or Swarovski straight away. Get a mid-range pair then upgrade slowly. 

For those who are impatient to go through the entire blog series, I'm giving below direct links to all the posts. You can go directly to the page you are interested in, though I suggest you go through each post as all of them contain some information that will be useful when you consider purchasing a binocular for your self.

1.       Introduction
2.       Part – 1: Anatomy of a Binocular
3.       Part – 2: Purpose and Portability
4.       Part – 3: Magnification, Objective diameter & FOV
5.       Part – 4: Eye Relief
6.       Part – 5: Exit pupil & Interpupillary distance
7.       Part – 6: Image brightness
8.       Part – 7: Focusing fundamentals
9.       Part – 8: Weather sealing
10.   Part – 9: Purchase decision
11.   Part – 10: Care & Storage
12.  Afterthoughts and accessories